
In this tutorial, you will learn how to set up any ZSA keyboard to effectively edit in DaVinci Resolve.
Sometimes the intricate finger gymnastics of "shortcuts" take so much longer that you might opt to interact with the interface of the application instead.
How do ZSA keyboards solve this?
With ZSA keyboards, you can execute shortcuts with a single keypress that on a standard keyboard require multiple keypresses.
Shortcuts like 'CTRL + Z' to undo things and 'CTRL + B' to bold selected items are easy to remember. But once you start having to press 'CTRL + ALT + SHIFT + F11' all at once, you might just give up and use your mouse instead. ZSA keyboards use QMK, which is souped-up firmware with the ability to assign complicated shortcuts onto a single key (and do way more beyond that).
For me, the reduction in keypresses leads to faster and more direct interaction with DaVinci Resolve than any other hardware I have used has allowed.

Methodology of the DaVinci Resolve Layout
When I first started using Tap Dancing in DaVinci Resolve, I hoped to find a way to edit using just the keyboard. I quickly realized when setting this up that not every menu and panel in DaVinci Resolve is accessible via shortcuts. Instead, I moved as much functionality to the left half of the keyboard as possible with the most used shortcuts grouped on and around the home row of keys and resigned myself to using a mouse in my right hand (a mouse with extra buttons with similar access to macros).
I created this layout to emulate as many functions of the Blackmagic Design's DaVinci Resolve Editor Keyboard and Speed Editor keyboards as possible, as well as to accommodate functions that are not covered by those boards in the Color, Fairlight, and Fusion pages. This layout includes ways to access important functions such as volume, keyboard brightness, and virtual switching desktops directly.
Setting Up the Layout in DaVinci Resolve
Technically, much of the layout will work without importing these custom shortcuts, but things like switching pages with the launcher layer will not function without them.
- Download the keymap files, and pick the one for your OS. These work with DaVinci Resolve V17 and V18.
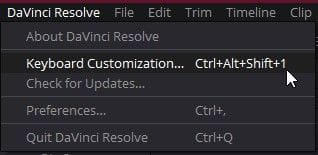
- With DaVinci Resolve open, navigate to DaVinci Resolve -> Keyboard Customization.
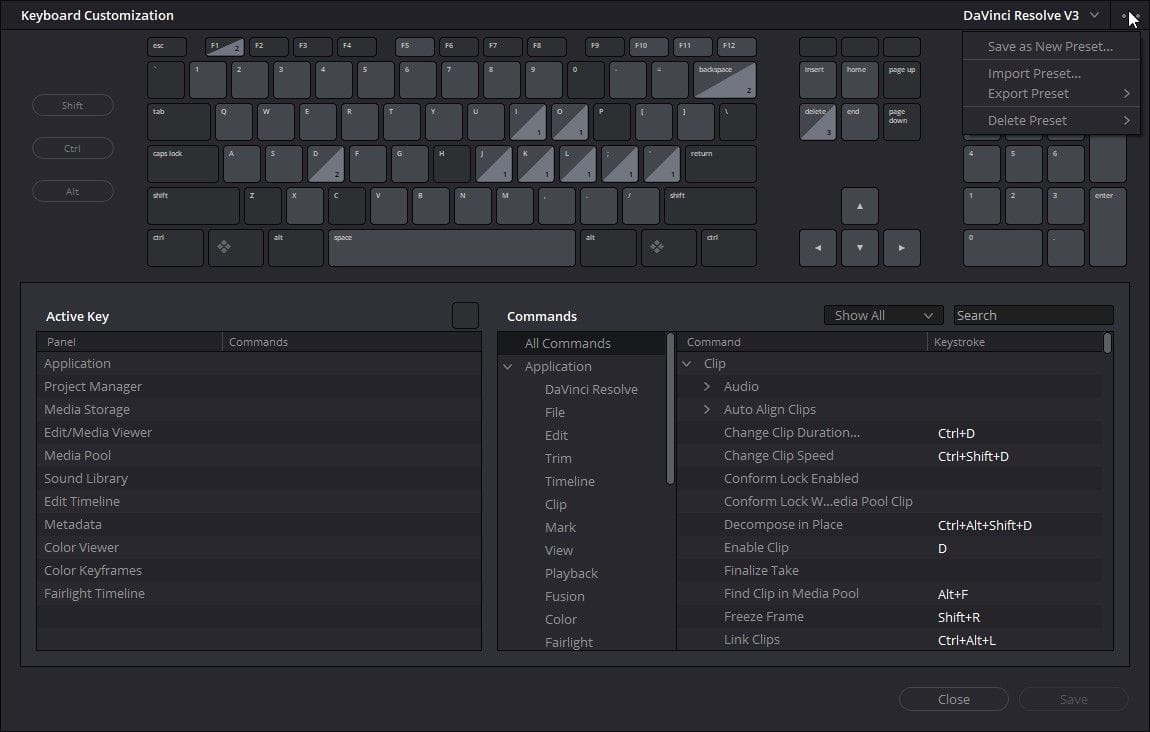
- At the top right of the Keyboard Customization menu, click the three dots, which will allow you to manage your presets.
- Back up your shortcuts just in case by using the 'Save as new preset' option Export Preset -> PRESET (you do not need to back up if you are using the default shortcuts file with no custom shortcuts).
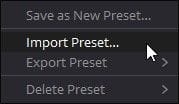
- Using those same three dots to open back up the preset menu, press the import preset option.
- Navigate to your Downloads folder to import the .txt file.
The Layout
With the shortcuts file imported into DaVinci Resolve with the above steps, you can now choose the layout for your keyboard & OS and then modify, download, and flash to the appropriate ZSA keyboard with Oryx.
With the use of the layer launcher, you can quickly switch between pages, making the page's GUI unnecessary. You can remove the UI element by going to Workspace -> Show Page Navigation, which will remove the bar on the bottom that indicates which DaVinci page you are on, freeing up valuable screen real estate.
The first thing you'll notice with this layout is that the JKL keys have been relocated to the home row. This is to enable you, in conjunction with voice dictation, to accomplish the majority of tasks, like labeling a folder, without having to switch your right hand from your mouse to your keyboard to type. When you need to use other DaVinci Resolve pages, such as the Color page, you can move to that keyboard layer to help with those specific tasks while retaining some of the same important navigational key structure you are used to from the main editing layer (Edit1).

Moonlander Layouts
ErgoDox EZ Layouts
- DaVinci Resolve 17 w/No Typing layer (outdated)
- DaVinci Resolve 17 w/Typing Layer (outdated, old)
Planck EZ Layouts
Planck Mac DaVinci (work in progress)
Comparing the Black Magic DaVinci Resolve Keyboards to ZSA Keyboards

The layouts on ZSA keyboards are infinitely customizable. With the Blackmagic keyboards, you are confined to specific workflows if you want to make use of all the buttons. Both the Speed Editor and Editor Keyboards are limited to the functions labeled on their keys. The Speed Editor is intended primarily for use on the Cut page.
On the Moonlander—and to some extent, the ErgoDox EZ—you can mount the keyboard exactly the way you want. I like an extreme 80% tent, which I think based on the literature has superior ergonomics as well as allowing for a more condensed workspace. I can fit in a macro pad or any other peripheral as well into roughly the same footprint that only one device, under normal circumstances, would fit.
Maybe the biggest difficulty with ZSA's keyboards is the initial learning curve. Not every button is labeled, unlike on the Blackmagic boards. I would contend that referencing labels directly on the keycaps is not much different from referencing your keyboard layout onscreen, a printed PDF, or some such. Generally it's not ideal to look down at your keyboard in either case; Live Training allows you to reference your entire layout as you use it without ever having to look down.
RGB makes up for the lack of labels to an extent, and plays an important role in showing where there are groups of functionality with distinctly different functionality from other keys. For example, if you see the same color next to each other, it's safe to assume that it is an up or down arrow or executes similar shortcuts. This hopefully reduces the learning curve.
You also miss out on the dedicated transport control knob, which allows you to do things like quickly scroll through your source media and choose in and out points. The shuttle function may be difficult to use, but the Jog is controlled well enough with the JKL keys, so the main loss is the Scroll function of both Blackmagic devices.
While some of the buttons (such as Smart Insert) have no shortcut equivalent, because you are already using a mouse with the Moonlander, you don't have to add an additional button to memorize on your keyboard and you can simply click it with your mouse.

The Speed Editor keyboard primarily works with the Cut page. Usually when I'm putting together a project, everything is madness. I might import some footage, then jump into the Edit page and review some clips in the source. I might then subclip a bit of media in preparation for inserting some of those clips in the timeline to start building the project out. At the same time, I might be adding some metadata to those subclips and start constructing smart bins in order to work with that metadata. The Speed Editor is not conducive to most of that workflow.
I prefer to switch hardware as infrequently as possible, so a dedicated piece of hardware for just the Cut page doesn't make sense for me.
The Editor Keyboard and the Speed Editor both have Cherry Red switches. Neither of the Blackmagic boards have hot-swappable switches, while all the ZSA boards are hot-swappable. I prefer hot-swappable switches for repairability, and I also like having multiple different switches on the same board.
Transporting the Moonlander and the Planck are probably the easiest out of all of the devices. In particular, I prefer the Moonlander simply because it comes with a case and I can decide whether I want to even bring the right half of the keyboard.
The Planck might be the best if you have specific size limitations on your desk or for some reason its small size would be easier to transport. It can even be somewhat ergonomic for editing if you don't center it between your shoulders and instead put it off to the left. From there you can tent it a bit, and you have an extremely capable board!
All of the devices mentioned are of high build quality, and I don't think you'll be regretting your purchase based on that.
Ergonomics
Video editing can easily lead to RSI. One of the best ways I have found to combat RSI is to tent my keyboard at about 80%, avoiding pronation and radial flexion of my wrists. I also elevate my mouse to the bottom of my home row so my mouse hand's shoulder isn't at a different height from the other.
Other things are important to keep in mind besides just your keyboard when it comes to ergonomics. Please pay attention to your chair and its height, desk height, monitor distance, and so on. Most offices supply only standard keyboards and don't address proper keyboard positions because they simply don't know they exist. They also don't consider niche hardware because the majority of office users don't use much beyond the good old keyboard. Your healthy ergonomics may be up to you.
This is all to say: If you are looking for a keyboard to ensure an ergonomic setup, just know you may need to make other changes to really meet those needs.


Deciding Between ZSA Keyboards for This DaVinci Resolve Layout
Without consideration of specific limitations, the best keyboard for most people is the Moonlander. With the Moonlander's adjustable thumb cluster, and 36 keys on each half of the board, it is perfect for video editing. The Moonlander has a lot of memory, so you can store more tap dancing keys, layers, per-key RGB, etc.
A big benefit to the Moonlander is you can still see the RGB on the thumb cluster when the keyboard is tented to 80%, so you can reference what layer you are on without craning your neck to the side.
Because the Moonlander has pre-threaded holes, it offers the most potential for mounting in different ways on the back of the board, including with ZSA's own tripod adapter kit. You can also 3D print awesome stands that people have created.
If you are looking for just a dedicated macro pad for video editing, ZSA's Halfmoon, when it comes out, is the most obvious choice. You get the most ergonomic board with more memory than you could possibly use. And you can always get the right half of the keyboard later if you decide to!
The ErgoDox EZ has double the thumb cluster keys, but is otherwise similar to the Moonlander—except it has very little memory by comparison. This is why in my own layouts, the Moonlander has a more advanced layout than the ErgoDox EZ (which lacks what I call the 'typing' layer).
The Planck EZ is great for short-duration editing, or if you have to have as many keys in as compact area as possible. The Planck EZ is better than the ErgoDox EZ for video editing simply because it has more memory and consequently can support a more advanced layout. It should be pointed out that the Planck will put your wrists in the incorrect position if you type in the standard position, but just like the other boards, you can place it off to the left, since you are not meant to use this layout for much input via the right hand.
You can even tent the Planck EZ by propping it up on just about any surface like a laptop and gain back some ergonomic potential—as long as you don't have to move it to type too often during the editing process.
Keyswitches
In the ZSA keyboard stenography tutorial, Paul Fioravanti recommends using the lightest switches possible, and I follow the same advice for video editing. I use Kailh Speed Silver switches with rubber O-rings because I like the way they make the keyboard sound as I'm typing.
For the outer keys outside of where the alpha keys are normally positioned, I like to use different switches. This helps me notice if I'm actually pressing the right button or not, or if my hand is positioned incorrectly.
Other Peripherals
In addition to your ZSA keyboard, other hardware such as macro pads, foot pedals, or the Stream Deck can all significantly extend the functionality and usability of your editing setup. While you can get almost anything done with just the keyboard, other peripherals can absolutely complement the Moonlander. I do not recommend getting them all at once: Familiarize yourself with each item carefully until you fully utilize it, and then add the next item.
- SteelSeries Aerox 9 gives you 12 extra buttons for your right hand!
- Logitech Lift is the best vertical mouse with a replaceable battery
- Elgato Stream Deck, for my least used and hardest-to-remember shortcuts
- Elgato Stream Deck Pedal has the same functions as the Stream Deck, but for your feet
- Capisco Chair lets you change sitting positions easily. Buy it used!
