As a mechanical keyboard user, you have probably put a great deal of thought and effort into improving your typing habits.
Perhaps you have been looking past QWERTY, and towards Dvorak, Colemak, or Workman to get that extra edge in speed and comfort when spending long sessions with your clack-y friend.
Well, there is an option available that you may not have considered. One that has been around since the 1800s, and has the potential to supercharge your speeds past 200 (or even past 300!) words-per-minute: Stenography, now available in Oryx!
Note: This is our first-ever guest blog post. To learn more, scroll down to the author bio below. Thanks, Paul! -ed
What is Stenography?
Stenography is the process of writing in shorthand, which, on a keyboard, is performed through the use of chorded keystrokes: pressing multiple keys together, like playing a piano.
The output of these strokes can be anything from a single letter, a word, multiple words, or full phrases, yielding more output-per-keystroke than other input methods.
The power and speed of these chorded keystrokes enables professional stenographers and court reporters to capture text at the speed of speech. You won't find any QWERTY keyboards recording testimony in a court of law!
How can I get it?
Stenography has been a locked-down art for a long time: its software had been proprietary, and the specialised keyboards used for it can cost as much as a high-end computer.
However, thanks to the efforts of the Open Steno Project, founded by Mirabai Knight, we now have Plover (rhymes with "lover"), an open stenography engine, available to everyone. It can turn your existing NKRO-compatible keyboard, which your ZSA keyboard most definitely is, into a fully-fledged steno-chording machine!
There are many different stenography "theories" out there (methods for inputting stenographic strokes with a keyboard), much like there are different human languages, along with their own dialects and accents. However, Plover is currently the only one that is openly available and free.
So, unless you have already made the decision to enrol in a stenography school that teaches a certain theory, I would highly recommend at least starting with Plover, which is what we will do.
Setting up Plover
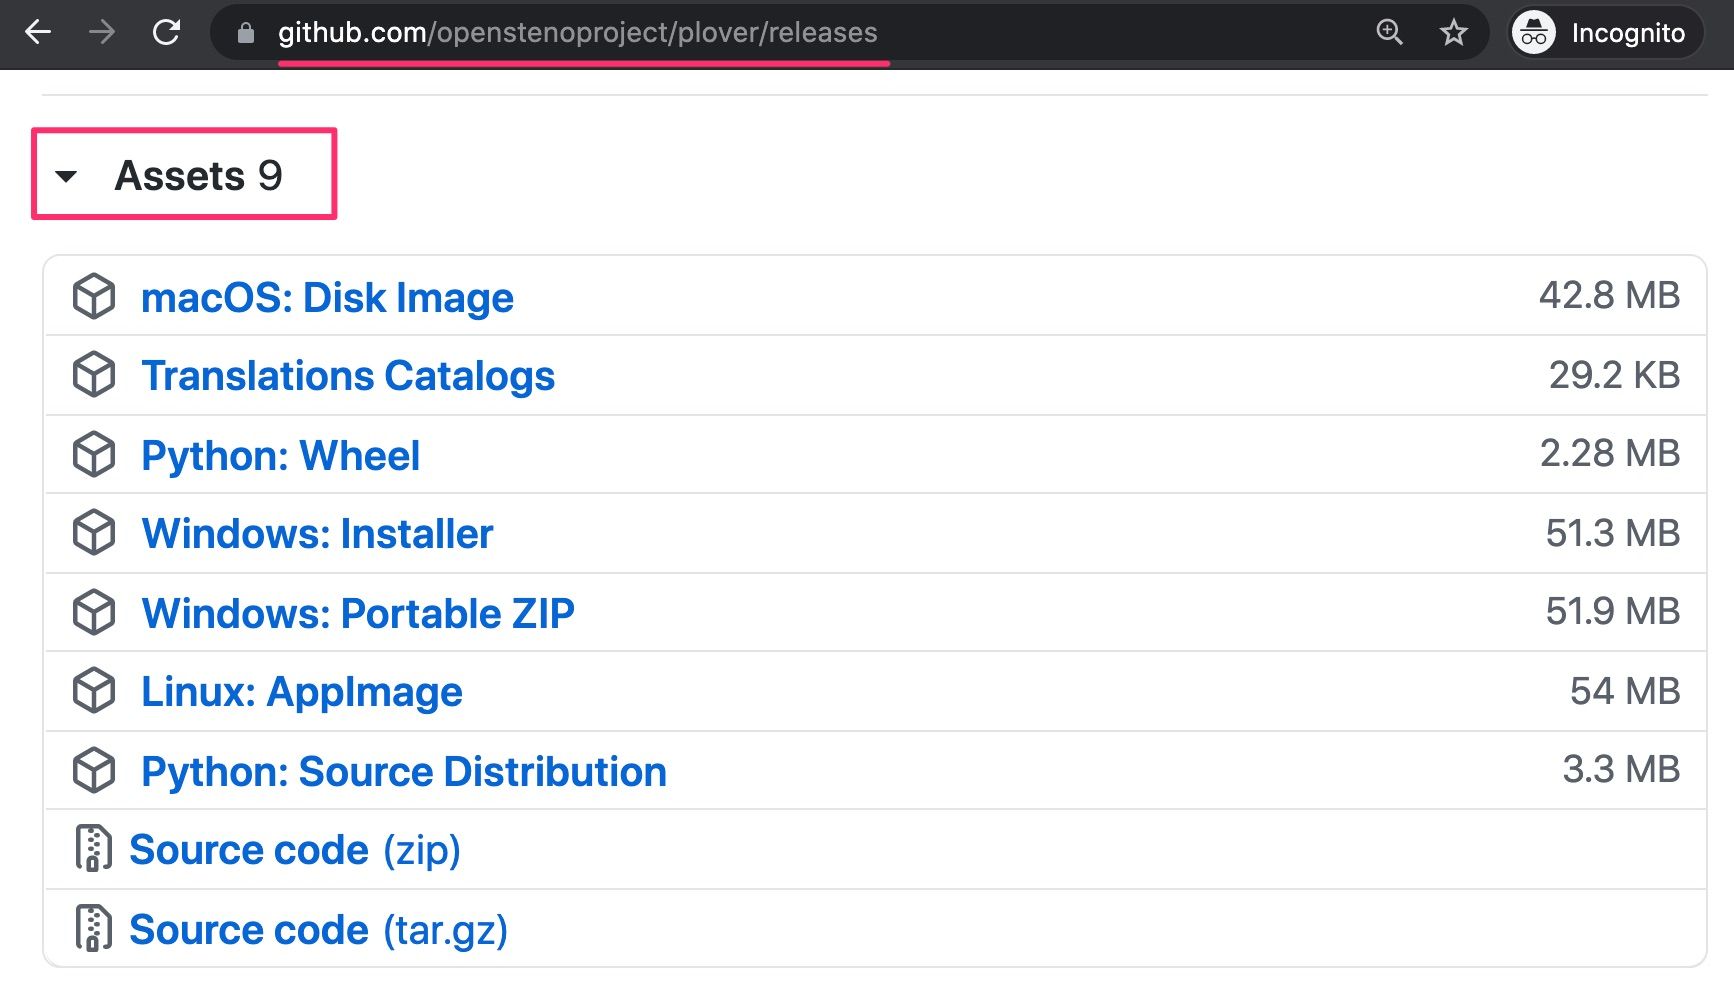
You can install Plover by following their installation guide. As of this writing, Plover is under active development, so I would recommend downloading the latest release directly from Github (click the Assets link at the bottom of the release notes to reveal the application files, and download the one that's relevant for your operating system).
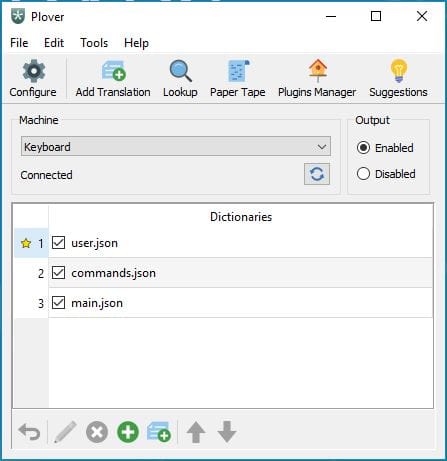
After installing Plover, open it, and click the Output Enabled radio button. Plover will now listen out for any keyboard strokes you make, and attempt to translate them into stenographic output.
Here's what it looks like on Windows:
And on macOS:

In order to get your keyboard typing in QWERTY again, you have to click the Output Disabled radio button.
If you are having issues getting Plover up and running, be sure to check out Plover's Troubleshooting page.
Steno Protocols
Constantly enabling and disabling steno like this is a hassle, but there is a better way: we can have Plover listen only for strokes that are sent in a specialised steno machine protocol, and just ignore standard keyboard strokes. This will mean you can keep Plover's steno output Enabled, and still get the expected output when you type.
The only problem is that your standard QWERTY keyboard layers do not know how to speak in steno protocols. So, we will be using Oryx to configure a new keyboard layer contains a proper stenographic keyboard layout, uses QMK steno keys, and speaks fluent steno protocols!
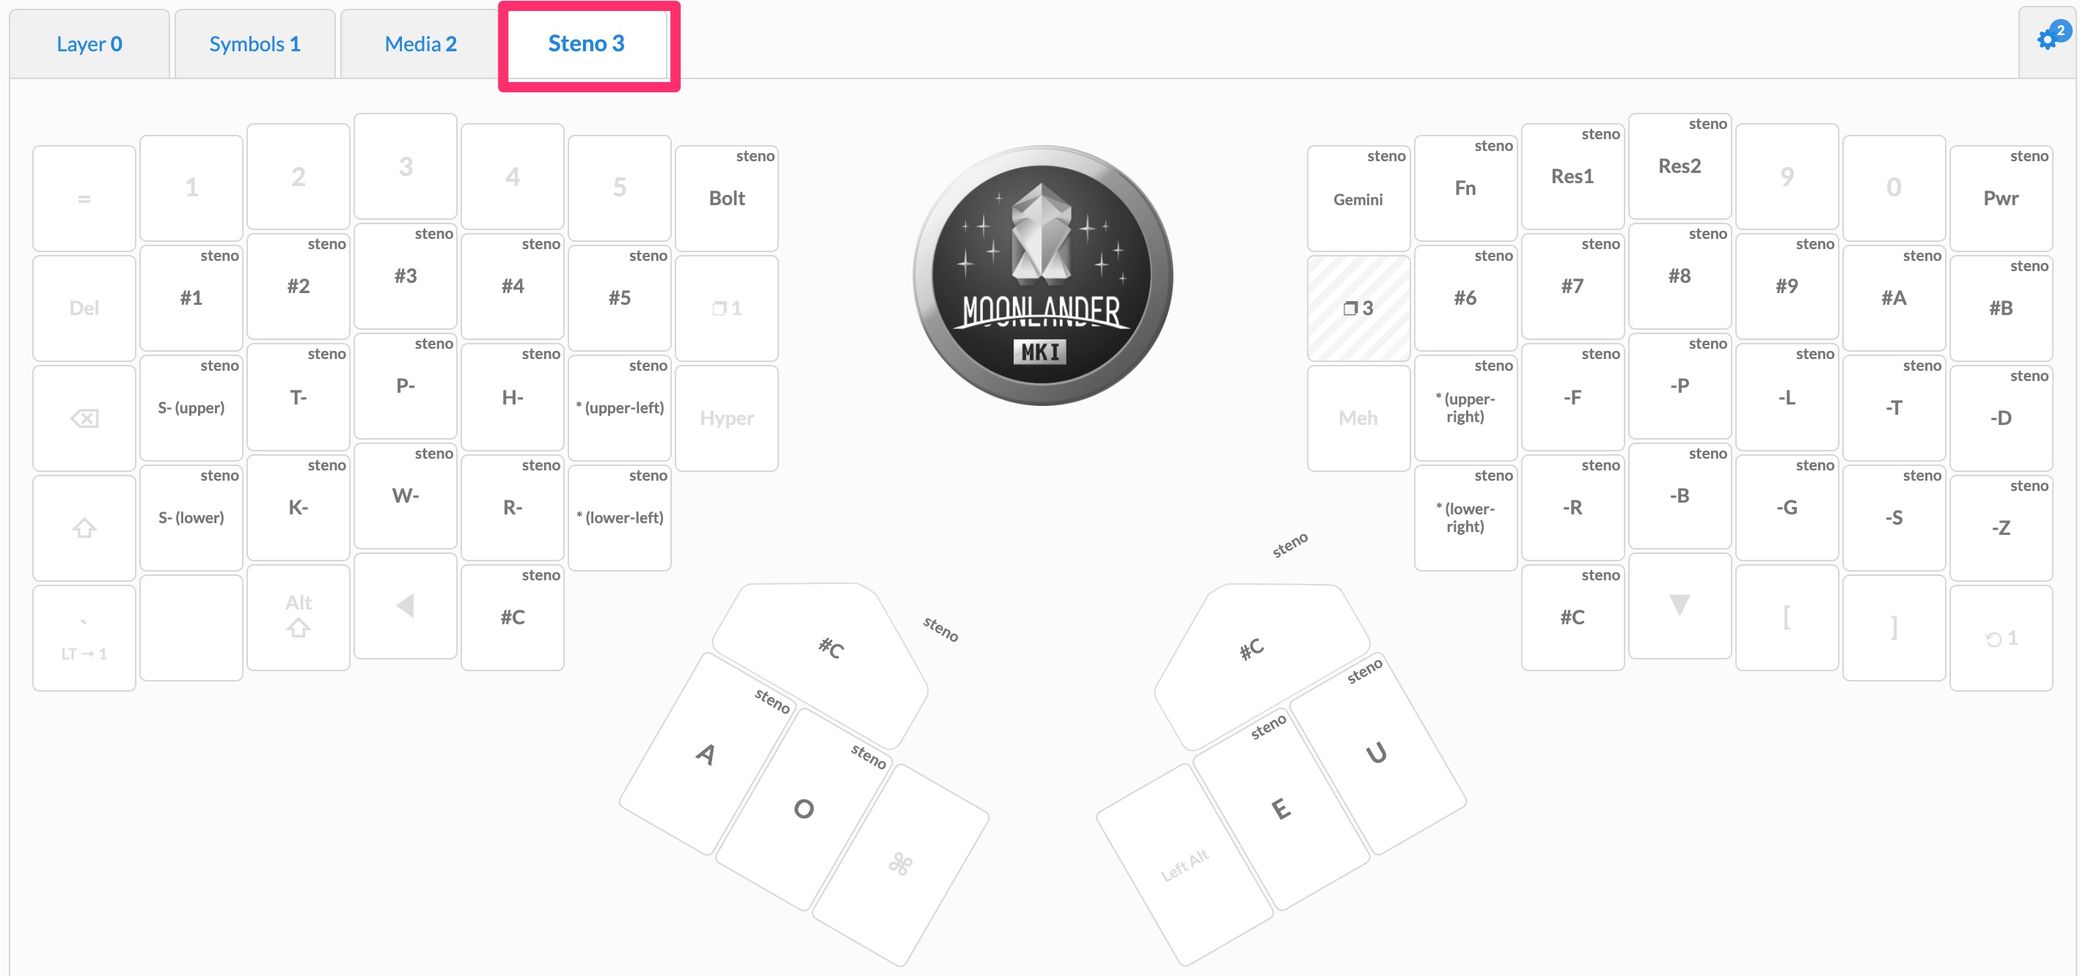
Setting Up Your Layout
You can enable stenography in Oryx via the Advanced Configuration Settings, under the new Stenography section.
Flip the Steno switch on, and steno keycodes will become available in the Oryx Keycode dropdown list.
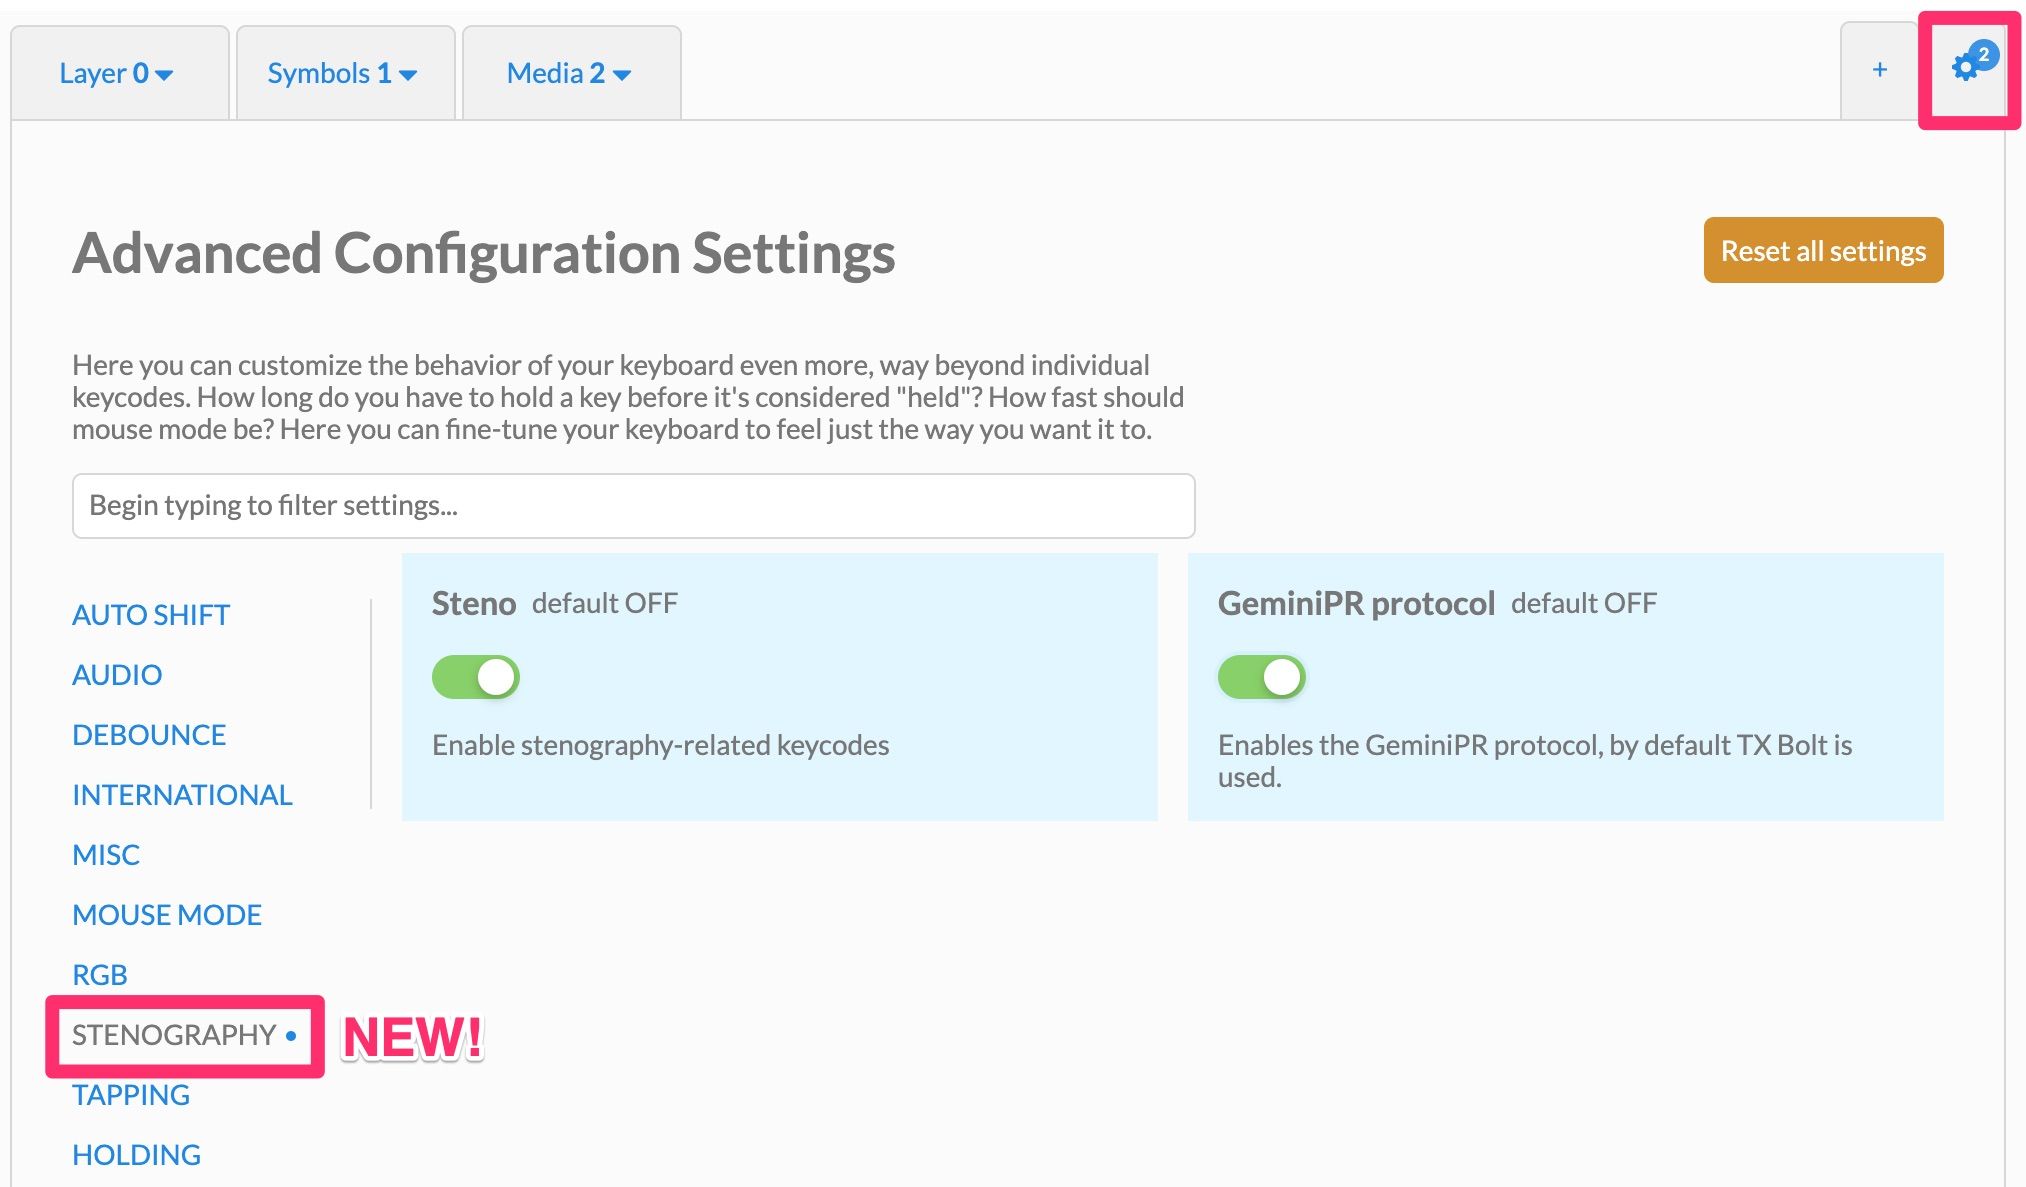
Plover itself supports several protocols, but the QMK firmware that Oryx is built on top of only supports two: TX Bolt and GeminiPR.
The details of these protocols are not important for our purposes, suffice to say that TX Bolt is QMK's default steno protocol, and GeminiPR is a newer and improved protocol.
So, we will configure our steno layers to send keystrokes in GeminiPR by flipping the GeminiPR Protocol switch on.
Reference Layouts
To get you up and running with steno immediately, I've created reference keyboard layouts which include a steno layer for all the keyboards Oryx currently supports:
Each of the layouts is based on the default one provided by Oryx, so feel free to use them as-is, modify them, or just use them as a reference to add a steno layer to your own layout (like I did for my own personal layout).
Note that the Oryx key (used for Live Training) and steno unfortunately cannot co-exist in a single layout. So, the Oryx keys have had to be removed from the example layouts above. If you have an Oryx key in your own layout, you will be prompted to remove it before you are allowed to compile your layout with stenography enabled.
After compiling your layout on Oryx, download it, and then flash your keyboard with it using Wally, and your keyboard will be ready to start chording steno!
Configuration
Since we configured our steno layer in Oryx to use GeminiPR, our keyboard is ready to start sending keyboard strokes in a steno protocol.
Note that the reference layouts contain specific Gemini and Bolt keys, on the off-chance that you need to switch protocols, but we will be staying with GeminiPR moving forward.
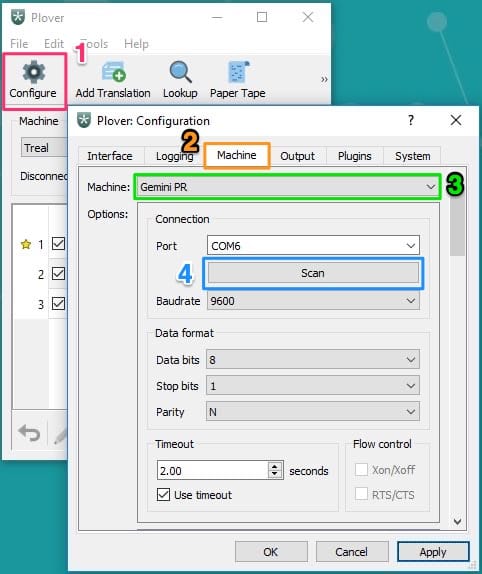
Now, to get Plover to start accepting strokes in GeminiPR, we need to perform the following steps:
- Click the Configure button
- Select the Machine tab
- Select GeminiPR from the Machine dropdown menu
- Press the Scan button
That's what this looks like on Windows:
And on macOS:
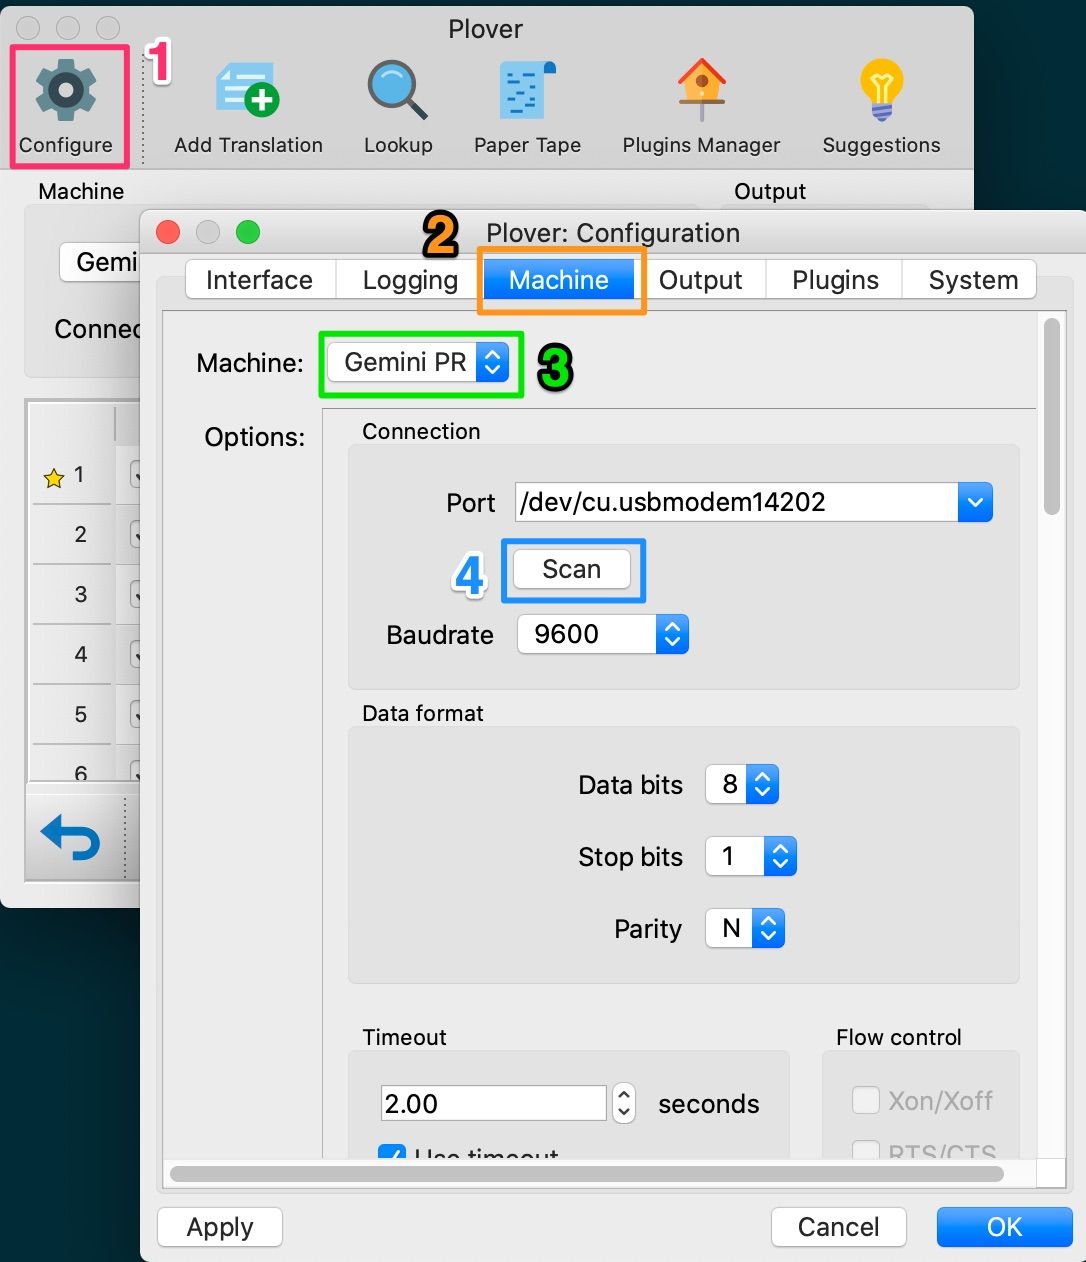
This will fill up your Port dropdown menu with all the potential device options that Plover has found.
On Windows it would likely be COM6 (or some other number after COM).
If your dropdown menu contains many serial devices, and you do not want to go
blindly through each of them looking for your keyboard, you can confirm
exactly which port it is in your system's Ports (COM & LPT) section. It
should be listed as USB Serial Device:
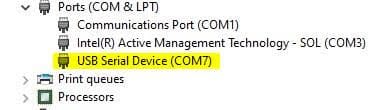
If you are someone with a lot of connected devices, who often identifies serial ports by their Vendor ID (VID), check for the hex number 0x3297, which is used for all ZSA keyboards.
On macOS, it would be something like /dev/cu.usbmodem14202 (or some other number after "usbmodem")
Once you have selected your device, press the Apply button, and give your keyboard a test! Open up a text editor and press the steno E key (near your right thumb), and if it outputs "he", then you have steno working! Try pressing some of the other keys, as well as chording some keys together, and see what output you get!
If you switch back and forth between your QWERTY and steno layers, you should now get standard keyboard output on your QWERTY layer, and steno output on your steno layer. No further Plover input toggling needed!
Learning Stenography
Now comes the part that will involve a lot more time and effort: learning stenography.
Plover's Learning Stenography page is the best place to start looking for materials that suit your learning style. My personal journey with stenography has so far consisted of:
- Read the Learn Plover! and Art of Chording textbooks (I also printed out the Cheat Sheet from Learn Plover! while getting used to the layout and the different chords).
- Practice the lessons learned there in Typey Type, a free typing application specifically to practice stenography (try keeping a log of your practice. Here's mine!)
- Do the theory and practice lessons on the Platinum Steno YouTube channel. They are excellent, but do not use Plover theory (they use one derived from another theory called StenEd), and the lessons can get quite advanced. So, I would personally only recommend looking here after you gain a firm grasp and familiarity with steno and Plover.
- Create custom steno dictionaries containing keystrokes for words that are not currently in Plover, or for specialised vocabulary etc (Here are my custom dictionaries!). I would definitely suggest learning the steno/Plover rules first before attempting to break them or go off on your own path.
Learning stenography feels more like learning a new language, rather than just a new keyboard layout, and so consequently it will likely take some time and practice before you start to reach a basic level of competency.
Since the time I am able to dedicate to learning stenography is limited, my own progress has been slow but immensely satisfying and enjoyable. However, my enthusiasm levels for the art have stayed high: enough to initially reach out to ZSA and ask them to make steno available in Oryx, which led to writing this post to promote the feature, and convince you to give it a try!
Although I still consider myself a beginner, in order to show you what steno on an Ergodox looks like, here is a video of my own current progress with Plover, currently at a humble 50 words-per-minute:
youtube: https://www.youtube.com/embed/f3TQJidRIbU
You will not find me in court recording testimony anytime soon, but I am hoping to eventually match my current QWERTY speeds, and then integrate steno into my work writing software.
Customizing your Keyboard
I started learning stenography on an Ergodox EZ with Gateron Brown switches, and keycaps with a DCS profile. But, as I started getting a bit more serious with steno, I found that making a few modifications made the chording experience that much better.
These modifications are not mandatory, especially not at the very beginning of your steno journey, but are presented here for your consideration should you decide to move forward with doing more steno on your ZSA board.
Keycaps
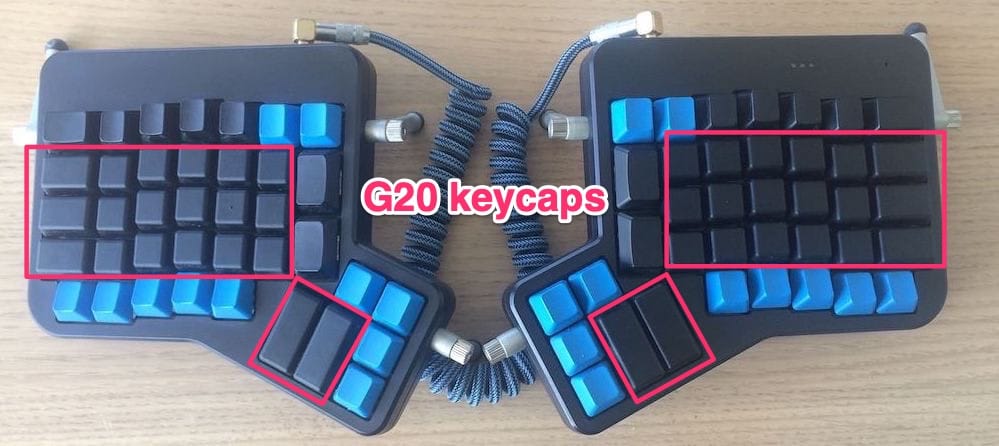
Since stenography is all about chording keystrokes, the flatter your key caps, the easier chording will be. The steno home row is technically on the cracks between the two main rows of keys, rather than on a row itself, so flatter keys will help your fingers nestle more comfortably in this space.
If you are like me, and have DCS or some other ergonomically sculpted key caps, you may find chording and home row placement difficult. In order to get the keys closer together, I actually ended up changing the direction of the caps on some rows. But, the better long term solution was to change the keycaps on the steno keys to use G20 Blank Keysets, or some other similar keycap set (I did not end up changing all the key caps on the board).
Keyswitches
When it comes to switches for steno chording, the lighter the actuation force, the better. After using my Gateron Browns during my initial steno learning, I decided to look into more steno-friendly switches.
Based on advice in the Plover Keyswitch Guide, I switched over to Kailh Speed Silver switches. This helped make steno chording easier, especially for complex chords that involve many keys, and I found that my hands became less fatigued after making the switch.
Give steno a try!
I sincerely hope that this post has gotten you at least a bit steno-curious about the potential of using your ZSA keyboard beyond a standard QWERTY layout.
Thanks to the Open Steno Project, Plover, and now code-less steno layout generation with Oryx, the barrier to entry for using stenography and stenographic layouts on an existing NKRO keyboard is the lowest its ever been, so there has never been a better time to jump in to what could be your newest hobby!
If you would like to engage more with the steno/Plover community, and meet others new to stenography, I would highly recommended joining the Plover Discord Server, or check out Plover's Links to the Steno Community for other community resources.
Happy Chording!
Special thanks to:
- Di MacDonald, creator of Typey Type, for proofreading this post.
- The ZSA team: Erez Zukerman, Florian Didron, Tisha Stacey, for all their work in developing, supporting, and guiding stenography as an Oryx feature out to public release.
You can follow me, Paul Fioravanti, at my website, on Twitter, and on Github.
I have tried to share other learnings from my steno journey, so if you are interested in more related steno content, you may find the following posts from my blog of interest:
- Starting Stenography with an Ergodox
- Chording QWERTY with QMK Combos
- I Completed Typey Type
- Stenography Numbers on a Georgi
- ...and hopefully more in the future!