
Layout Buffet is a series about the many things your keyboard can do. Each post explains an Oryx feature or layout idea and how you can try it a little at a time. Just like a buffet, how much you grab is up to you. If you try a bite and love it, you can come back for more. If it’s not for you, there are other options. Sample, experiment, and figure out what you like and what you don’t.
Every Layout Buffet post is typed using the concept covered in that post, so you know it’s not just theory.
Let’s dig in!
If I could only choose one of feature of our boards to use in my own layout, it would be a tossup between dual-function keys and layers, but I think I would land on layers. They can be used for so many different things. I can’t tell you what exactly your layers should look like because that’s different for everyone, but I can give you some principles to help organize your layers and make them as effective as possible.
If you start reading and feel like you need to take one step back to understand what layers even are, check out this Layer Basics article, then come back. If you have read that article but it’s been a while, here are the highlights:
- Layers work like sheets of paper stacked on top of one another.
- You can switch layers up but not down (with one exception).
- If you don’t assign a key in a layer, it will be transparent, which means it does the same thing on that layer as it does on your base layer.
Layer-switching keys
There are quite a few different keys to switch layers. Briefly, in rough order of popularity, they are:
- MO (Momentary) - changes your layer while held down
- TG (Toggle) - changes your layer when you tap it; changes back when you tap it again
- TO (”To”, i.e. direct switch) - changes your layer when you tap it while clearing out your layer stack, meaning you can switch up and down with it (more on this in a bit)
- OSL (One-shot layer) - changes your layer when you tap, then changes it back after you hit a key on that layer
- TT (Tap Toggle) - changes your layer momentarily while you hold it or toggles your layer on when you tap it
- LM (Layer-modifier) - momentarily changes your layer with a specific modifier (Shift, Ctrl, etc.) active at the same time
There is also a Layer Lock key. When tapped, it will keep your current layer active until you tap it again.
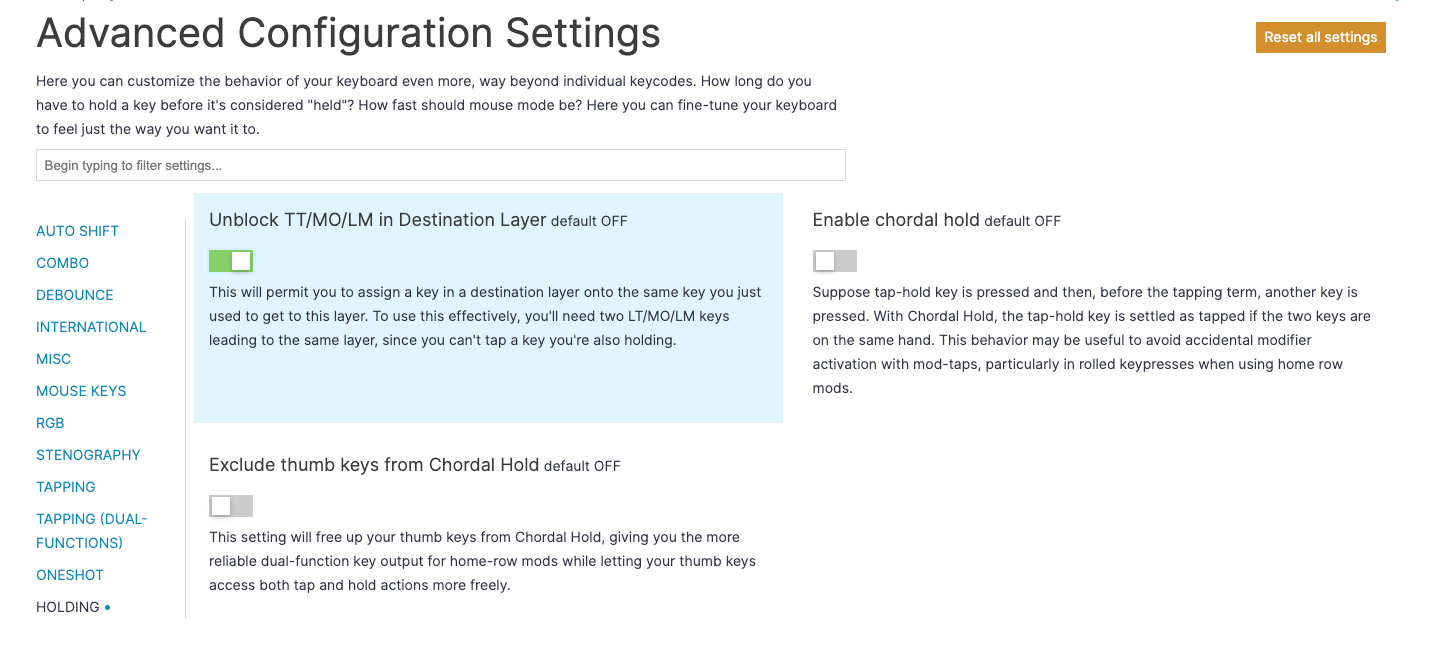
Reusing a layer-switching key in its layer
If you’re trying out these layer-switching keys, you’ll notice a lot of them prevent you from assigning something over them in the destination layer, the layer they’re switching to. This is so you don’t accidentally end up in a layer you can’t get out of.
If you don’t want this restriction, you can enable the Unblock TT/MO/LM in Destination Layer setting in the Holding section of your layout settings. Just remember that you need a different way to get out of a layer if you plan to overwrite your original layer-switching key.
Hold a layer to get to another layer
If you have a layer that you rarely access, you can set it up so the key to switch to that layer is within another layer. It’s a good way to free up key space in more important areas if you want to have a layer that controls the board’s lighting (which you would not be in very often), for example.

A slightly more complicated application of this idea is using two layer-switching keys to activate a third. In QMK, there is a feature for this called Tri-layer switching. This isn’t something we support in Oryx, but you can get very close with just the normal layer-switching keys.
You’ll want one layer-switching key that goes to layer A on your base layer (I’m using letters since the actual number of the layers isn’t important here), and a layer-switching key opposite that key on layer A that goes to layer C. Then, you’ll want that key on your base layer to switch to layer B, and another key on layer B that covers your layer-A layer-switch is that switches to layer C.
That probably doesn’t make a ton of sense to read, but don’t worry; a while back, I made a video demonstrating this that should be a lot clearer.
Arranging your layers
Now that you know how to switch layers, the real fun starts: arranging layers. There are two things to keep in mind that make this topic more straightforward than it might seem.
The most fundamental advice I can give you is to put your most-used layers lower in your stack (farther to the left in Oryx).

Keeping this one piece of advice in mind when setting up your layers will avoid a lot of problems. For example, let’s say you have a base layer for work, a base layer for playing games, and a symbol layer you want to access from both. Adding the gaming layer at the top of your stack won’t work because, as we know from the Layer Basics article above, layers switch up but not down.

But, if you think about the layers you’ll be in the most, it’s the two base layers. You only need to be in the symbol layer for a moment at a time. So, moving the gaming layer lower in the stack (at least below the symbol layer) makes sense and will fix the problem of switching.

Think of layers as trees
This imagery might not work for everyone, but it works for me, so I’m sharing it. If it doesn’t make sense, stick to my previous advice of putting your most-used layers as low as possible. I like to think of layers as trees, growing upwards.
")
Even though layers are sequential left to right in Oryx, I mentally turn them 90 degrees and think about the base layer as the trunk of a tree, and other layers as branches. When you think about layers like this, it’s clear that Layer 1 doesn’t have to have any bearing on Layer 2. They need a number for the firmware, but their numbered order does not matter, for the most part. This is why you can name your layers in Oryx, and why it’s usually a good idea to do so. The number of your layer doesn’t matter; what matters is what it does.
If I have two base-like layers, like the earlier example of a gaming layer, then I have two trunks that both connect to the branches.

Creating layer sets
What if you want a set of layers completely separate from your other layers for a different task? For example, a mini gaming layout of 2-3 layers within your overall layout. Or a set of layers for typing in a different language? If we’re going with the tree metaphor, it would be two separate trunks with their own branches.

To do this, you can make a “layer set”. It’s not a separate feature or anything, just a different way to think about your layers.
First, add a new layer that you’ll use as your layer set’s base layer. Unlike before, it doesn’t matter if this layer is low in your stack. In fact, I think it’s helpful for organization purposes if it’s not. I'm going to make a layer set for 3D modeling.

Then, add the other layers to your set above this one, and add the layer-switching keys you would want to use if this was an entirely separate layout.

Finally, you need a way to toggle your layer set’s base layer on. This is the perfect reason to use a TO key. Depending on what your layer set is for, you may want this more or less accessible. Personally, I use a set of two layers for gaming, which isn’t something I need to access quickly, so I tuck this away and use a combo to activate my base gaming layer. If you want a set for a different language, or an app, then you might want this shortcut a little more accessible for easier switching.

You’ll also need a TO key to switch back to your default base layer. Generally, it makes sense to mirror the way you get into your layer set.

Arranging the keys in your layers
Finally, the all important question: What do you put in layers?
The answer is different for everyone. You should put things in layers that you type regularly and either don’t have at all or don’t have a comfortable way to access from your base layer. For example, if you have a number row in your base layer, you can still access symbols by hitting Shift + 1–0. Do you want to access symbols that way? That’s up to you. The same goes for numbers, shortcuts like Ctrl + C and Ctrl + V, etc. Which of these things makes sense to put on a layer is up to you and your personal workflow.
What I can give you some concrete advice about is arranging the keys within your layers.
Should you fill a layer up or leave them open?
Another way to phrase this question is, “Do you want fewer layers or more layers with specific purposes?” A filled layer might look something like this (taken right from our default Voyager layout):

You can see this one layer does double duty. It has both symbols on the left hand and a numpad on the right.
If you look at a different layout, like my own layout, you might see layers more like this:

I have separate layers for symbols and numbers.
Which approach you choose is basically up to what makes sense to you. Do you find it helpful for your muscle memory if you can associate one layer switch (and thus one specific key or finger) with a certain set of actions? I do, which is why I went for split layers. You might instead find it more helpful if you have fewer layer switches to remember in general. If that sounds appealing, then go for more filled out layers. You can even set up multiple keys to switch to the same layer so you’ll have more flexibility in the fingers you’re using.
Should you group keys based on feeling or mnemonically?
These aren’t necessarily the only way to think about setting up your layers, but broadly speaking, two of the main ways to arrange your keys are based how they feel to press or how they relate to your base layer and what you’re used to (I’m called this mnemonic).
A mnemonic approach might look something like this (taken from our default Voyager layout):

Here you have the usual symbols you would access by hitting Shift and a number in the same order, but in the two rows below the number row. The benefit of a mnemonic setup is it’s usually going to be easier to remember.
A feeling-based approach might look more like this (taken from our default Moonlander layout):

Here you have some symbols arranged similarly to the above, but you also have the brackets in completely different places that are more comfortable to reach if you need to access brackets often (like for coding). The benefit of a feeling-based setup is it will probably be more comfortable in the long run, but it will also probably take you longer to feel comfortable with it.
Importantly, both of these approaches in our default layouts have an element of the other. Even if you’re setting up a more mnemonic arrangement, you still want to consider comfort. That’s why, for example, the default Voyager layout doesn’t put these symbols along the number row. That would be even easier to remember, but not as comfortable to hit. It would also be nearly the same motion as Shift + a number, which already works by default.
Likewise, even when brackets are prioritized in the Moonlander layer, some other lesser-used characters are still arranged mnemonically. The ! and @ are the same as the Voyager layout because it’s a pretty intuitive place for them.
You can even apply both approaches equally. In my symbols layer, I do this:

My home row is set up based on feeling. These symbols are arranged purely based on how frequently I use them to make sure they’re comfortable and quick to hit. The rows above and below my home row are set up more mnemonically, though. They follow the traditional number row arrangement of symbols on a US QWERTY layout. I did this because I don’t hit these symbols quite as frequently, so I don’t have as much opportunity to practice them, and having an additional way to remember where they are is helpful.
There’s no substitute for practice
This is a long article because layers are such a deep topic. There’s plenty more I could say, but I want to leave you with one more crucial piece of advice:
Do not stress about your layer setup!
There are a lot of things you can think about when it comes to layers, but you don’t have to consider everything, especially at first. I had a very simple layer setup for around a year before I started experimenting with my current setup. You can still get a lot done even if your setup is not perfect. If something starts to get really annoying, that’s a good cue that it’s worth changing.
And along the same lines, even if you think you figured out your perfect setup, it will take time to practice it. I didn’t really feel like I mastered my current layers for at least a month or so after I set them up, and I made several tweaks during that time as I practiced. Don’t forget that creating your layout is an iterative process, especially when it comes to layers. Make some educated guesses about what you think will work for you, try it out for a while, and change anything that doesn’t.
