Layout Buffet is a series about the many things your keyboard can do. Each post explains an Oryx feature or layout idea and how you can try it a little at a time. Just like a buffet, how much you grab is up to you. If you try a bite and love it, you can come back for more. If it’s not for you, there are other options. Sample, experiment, and figure out what you like and what you don’t.
Every Layout Buffet post is typed using the concept covered in that post, so you know it’s not just theory.
Let’s dig in!
If you look around at compact ergonomic keyboard layouts, chances are you’ll see home-row mods, and for good reason: they’re effective. But home-row mods are not the only way to set up your modifier keys if you want something different from traditional modifiers. Another option is what I like to call “sticker mods”.
Unlike home-row mods, sticker mods isn’t as widely recognized and doesn't have a singular agreed-upon name. The concept was popularized by layouts like the Seniply and Callum Oakley's. It uses one shot mods (modifier keys you tap once to apply to your next keystroke) along the home row of a different layer instead of traditional modifier keys. I like the term “sticker” mods because your modifiers work like stickers: you pick them up from a layer and stick them to your next press.

Who are sticker mods for?
The main benefit of sticker mods is the same as home-row mods: modifiers that are more comfortable to reach. Where sticker mods differs is, technically, you don’t have to use any dual-function keys at all. That means never having to worry about the right timeout or the right settings to avoid typos — these are non-issues. Now in practice, many people who use sticker mods do use some dual-function keys, but only on the thumbs which tend to be the easiest keys to turn into dual-function ones. This can eliminate most of the experimentation with settings that comes along with dual-function keys and home-row mods in particular. There’s way less to fiddle with.
What makes sticker mods a little tricky is they involve a different action to trigger mods than you’re probably used to. Sticker mods have you holding one key and tapping another key to apply it to your next press, which isn’t really an action you do on traditional keyboards. To type a capital “S”, I hold a layer switch, tap my Shift key, let go of the layer switch, then tap S. It’s two taps (really a hold then two taps) instead of a hold-tap.

So the type of adjustment for each style of modifiers is a little different. Getting used to sticker mods involves some more foundational retraining of your typing, which doesn’t make it worse, but it’s a different type of learning. Still, if the idea of experimenting with home-row mods and the related settings is unappealing to you, the learning curve of sticker mods might be worth it.
Personally, I found sticker mods easier to adjust to than I thought they would be. I’m still not a master of them, but I had the basic muscle memory down and was typing at a reasonable speed after just a couple of hours. They might sound complicated on paper, but in practice, they’re not bad.
Setting up sticker mods
Sticker mods use OSM (one shot modifier) keys. These are mods that will apply to the next key you hit if you tap them, or until you release them if you hold them down. Importantly, OSM keys do not count each other as the “one” press. So, if you need to press Ctrl + Shift + V, you can tap an OSM Ctrl, tap an OSM Shift, then tap V, and you’ll get the right combination.
The popular sticker mods setups you’ll see place these on a layer along your home row. This can be the ultimate goal, but there are two different ways you can take the first step.
Option 1: Try a sticker mod on your base layer
This is less of a sticker mod setup and more just a straightforward use of an OSM (one shot mod) key, but remember the ultimate goal is to make modifiers more comfortable to use. For some, it may be as simple as changing your traditional Shift key into an OSM key, letting you tap Shift instead of holding it.
This can work because, at least in my experience, a lot of the pain from traditional modifier keys comes from holding them down. My issue was holding Shift and unintentionally resting the full weight of my hand on one weak finger. Just tapping Shift cuts down on this hold time dramatically and may have been enough for me never to use home-row mods if I tried this route. This setup is also much easier to get started with because you’re not really making any layout changes. You just have the option to tap Shift now, but holding it will still work. You can lean on your existing muscle memory exactly as it is and only engage with the sticker mod idea when you need it.
If you try this and like it, then you may want to think about more sticker mods, and Option 2 below is a good next step. Once you’re comfortable with the idea of tapping a mod, then you can get used to the idea of holding a layer-switch to access that.
Otherwise, if you find this comfortable enough without getting deeper into sticker mods, you can just stop here. You did it!
Option 2: Try a “true” sticker-mod Shift
You could either come here after trying Option 1 above, or if you’re really excited about the idea of sticker mods, just start with this setup. Much like my recommended way to start using home-row mods, a good way to start out is with just one mod. This would involve creating a layer (or repurposing one you already have) to have a Shift OSM key under your pointer finger(s).
Then just try this for a while. It’s definitely going to feel weird at first, and you might even hate it, but try to give it at least a good 10-20 minutes, ideally over at least 3 sessions, 1 session per day, before making up your mind. The way you switch into this layer will make a big difference to your experience as well. Thumb keys work because they're convenient to hit quickly.
Sticker mods settings
One of the main selling points of sticker mods is there are not that many settings to be aware of, so this can be quick! There are only two settings in the One shot section of Oryx:
Oneshot Tap Toggle: This is an optional setting that lets you lock your one shot keys on if you press them a number of times quickly. I think this is a handy option to have for the occasional times I know I’ll need a mod active for a while — I like to put it at 2.
Oneshot timeout: Another optional setting that sets a time limit for how long your one shot mod stays on. I think this one is handy as well even if you set it to a high value and forget it about it. It’s a nice “just in case” sort of feature so you don’t end up triggering something you don’t mean to after stepping away from your computer or something.
If you do use dual-function thumb keys with your sticker mods, you may want to check out the article all about those, but you probably won’t need to dive super deep into those settings either.
Beyond the basic sticker mod layer
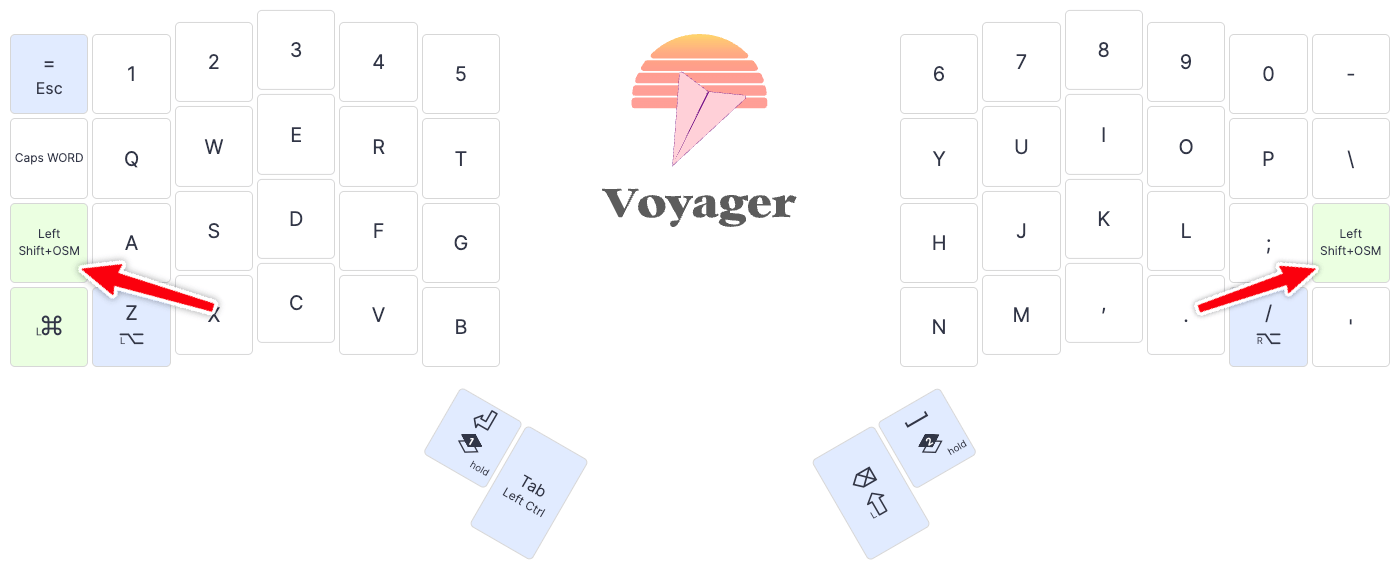
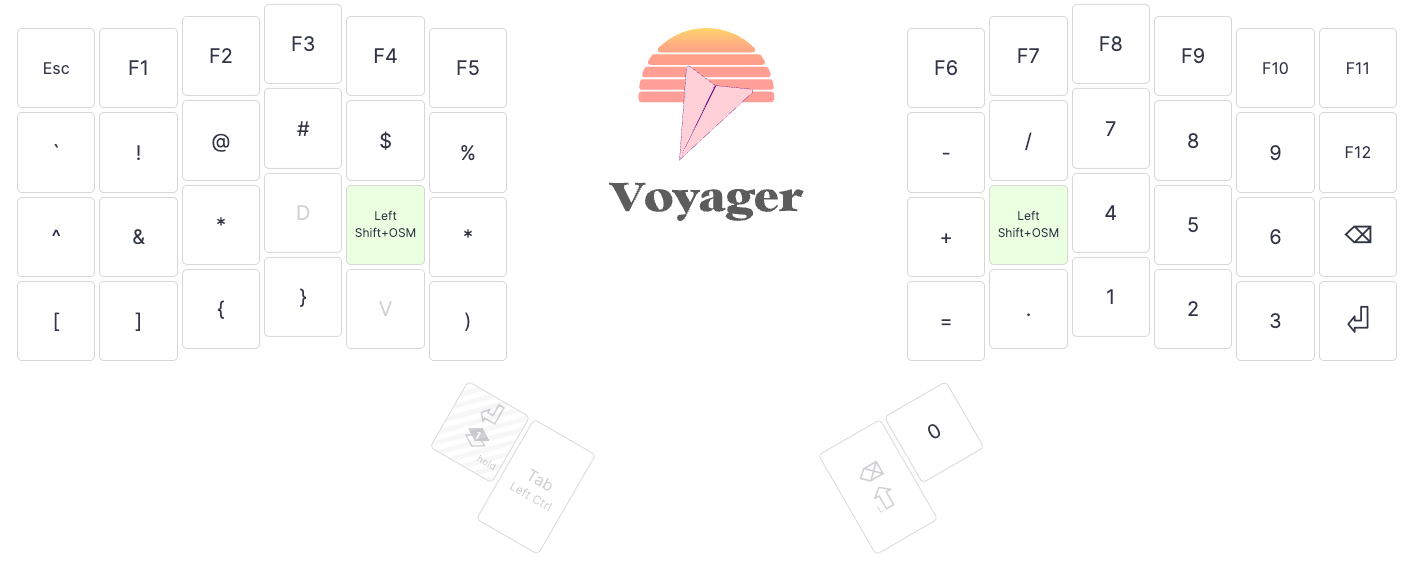
Of course, a whole layer just for sticker mods looks a little barren. As you get more comfortable with the concept, you can start to fill in keys around your sticker mods with whatever you’d like. You can also choose whether to mirror your sticker mods. I took a little inspiration from the Seniply and Callum layouts and put my own spin on it — this is my personal sticker mod setup that I used to write this article.
You’ll recognize a lot of elements from the default Voyager layout with a few additions. There’s a layout tour that walks through my reasoning for some of the further customizations. Again, start small and make the changes that make sense to you. Learning anything new is tough, especially a big layout change like this.
The most important thing is to stick with it. ;)